The plaster may be applied in one or more coats, but the thickness of a single coat should not exceed 12 mm. In the case of inferior or cheaper type of construction, the plaster may usually be one coat. For ordinary type of construction, the plaster is usually applied in two coats, whereas for superior type of works it is applied in three coats. The final setting coat should not be applied until the previous coat is almost dry. The previous surface should be scratched or roughened before applying the next coat of plaster. In plastering, the plaster mix is either applied by throwing it with great force against the walls or by pressing it on the surface.
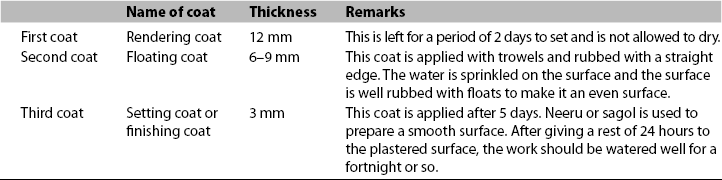
Table 21.1 Plaster in Three Coats with Lime Mortar
The methods of applying the following common types of plasters are as follows.
21.2.1 Lime plastering
Lime plastering is the process of covering the surfaces by lime plaster or mortar in various proportions depending upon the nature of work and the number of coats to be applied (Table 21.1).
21.2.1.1 Preparation of a surface for plastering
When a surface is to be plastered, the surface is prepared in the following manner:
- All the mortar joints of the wall to be plastered are left rough and projecting, so as to give a key or hold to the plaster. All the joints and surfaces are well cleaned with a wire brush and ensured that they are free from oil, grease, etc. If the surface is smooth or the wall to be plastered is an old one, then the mortar joints are raked out at least to a depth of 12 mm to give bond to the plaster.
- Projections more than 12 mm over the surface are knocked off so as to obtain a uniform surface of wall and also to reduce the consumption of plaster.
- Similarly, all the cavities and holes inside the surface are properly filled up in advance.
- All woodwork to be plastered is roughened.
- Finally, the mortar joints and surfaces of the wall are well washed, wetted with water and kept for at least 6 hours before plastering.
21.2.1.2 Groundwork of plaster
In order to obtain a true surface and uniform thickness, vertical strips called screeds and bands are formed on the wall surface by fixing dots. These dots are first of all applied horizontally and vertically at a distance of about 2 m, covering the entire wall surface. These dots are fixed by laying a small quantity of plaster on the surface in the forms of squares (15 cm × 15 cm) having thickness of about 10 mm. The verticality of dots, one over the other, is checked by means of a plumb bob. After fixing dots, the vertical strips of plaster known as screeds are formed in between the dots. These screeds serve as the gauges for maintaining even thickness of the plaster being applied. Mortar is then applied on the wall between groundworks of screeds so prepared.
21.2.1.3 Application of plaster coats
- First coat (or rough course of plastering or rendering coat): It is usual to provide an average thickness of first coat of plaster equal to 12 mm over brick or ashlar masonry and 20 mm on rubble masonry, the larger thickness on rubble masonry being due to the roughness of its surface and the necessity of providing a minimum covering of 6 mm of mortar to rubble. The first coat (rendering coat) of plaster is generally applied by dashing against the wall surface between the screeds mentioned above. It is then sprinkled frequently with sufficient quantity of water and rubbed well by means of floats.If a second coat, called floating coat, is to be applied, the surface of the first coat is left exposed to air for a period of 2 days to set but not to dry. After this period, the surface of the first coat is swept clear of any dust or loose particles, sprinkled with water and well beaten with thin strips of bamboo or cane. The surface of the first coat is kept wet till the second coat is applied.
- Second coat or floating coat: The second coat is applied after preparing the surface of the first coat as mentioned above. The second coat is spread out uniformly with trowels. It is pressed and rubbed with a wooden straight edge, to obtain the desired surface. It is finally finished by slightly sprinkling water over the plastered surface and rubbing it with the floats. The thickness of the second coat is usually between 6 and 9 mm.
- Third coat or final coat or finishing coat: This coat is applied after 5 days of the second coat. This coat consists of a cream of white or fat lime (called neeru or plaster’s putty) and fine white sand in the ratio of 1:2 laid in thickness of 3 mm with straight plane and is rubbed with a straight edge. The surface is well rubbed with a wooden float and then finally finished with a trowel to obtain the desired surface. A polishing stone is used to obtain a fine polished surface.
21.2.2 Cement plastering
Cement plastering is an ideal plastering for external renderings. It is specially suited for damp conditions such as bathrooms, reservoirs, water tanks, floors, copings, etc. where non-absorbent surfaces are desired. Cement plaster is usually applied in a single coat. However, in certain cases when the thickness of the plaster is more than 15 mm or it is desired to have a finer finish, the plaster is applied in two coats (Table 21.2).
The process of cement plastering in two coats is as follows:
- First coat or rough coat: Usually, the average thickness of the first coat of plaster is 12 mm on brick masonry or ashlar masonry and 23 mm on rubble masonry. In the case of concrete masonry, this thickness varies from 9 to 15 mm depending upon the nature of work. For the first coat, cement plaster with mix proportions as 1:3 or 4 (1 cement:3 or 4 sand) is generally used. The first coat of plaster is placed between the spaces or bays formed by the screeds on the wall surface. This plaster is applied with a mason’s trowel. The surface is then levelled by means of flat wooden floats and wooden straight edges and finally finished by polishing with a trowel. If a second coat or fine coat is to be applied, the surface of the first coat is not polished, but roughened with a scratching tool to form a key to the second coat of plaster. Table 21.2 Plaster in Three Coats with Cement Mortar

- Second coat or fine coat: Before applying the second coat, the first coat is left to set for at least 7 days and is roughened to form a proper key with the second coat. The second coat, consisting of pure Portland cement mixed with sufficient quantity of water, is applied after 6 hours. This second coat is laid in a thin layer of 3 mm maximum thickness over the rough and moist surface of the first coat. Finally, this coat is well trowelled and rubbed smooth. Each coat should be kept damp continuously by curing for at least 5–10 days.
21.2.3 Mud plastering
This is the cheapest type of plastering, generally employed in the construction of village houses, temporary sheds and structures of temporary importance. Besides being cheap it provides insulation against heat and keeps the house cool for comfortable living. Mud plastering (in two coats) is then carried out as below:
- The mud plaster, consisting of well-tempered clay, chopped straw and cow dung, is prepared in a homogenous mass as described earlier.
- The preparation of the wall surface and groundwork for plastering is done exactly in the same manner as that for lime or cement plastering.
- The first coat is then applied in a thickness of 12 mm by dashing the plaster or by placing it in the spaces formed by the screeds. The surface is then finished by means of a straight edge and a wooden float.
- After 24 hours of setting (but not drying) of the first coat, the second coat is applied in a thickness of 6 mm.
- No curing is done in this case but the surface is given a wash of fine white earth, cow dung and cement in a mix proportion of 3:2:1 respectively.